Amazon

Wednesday, February 29, 2012

One Charm Pack- Two Ideas to Make

12:00 AM 0 Comments
I have two sets of these charm packs and i had a lofty idea of making a rag quilt out of them before I realized I need much bigger squares for it so I decided to make some other things with it.

First I made a throw pillow using 10 of the 5x5 squares in the charm pack and 8 solid black charms from another pack (that was going to be the rag quilt back). I just sewed them together in a simple pattern, sewed the two sides together, and stuffed. Did a quick whip stitch to close it up and I have a cute mod inspired pillow.


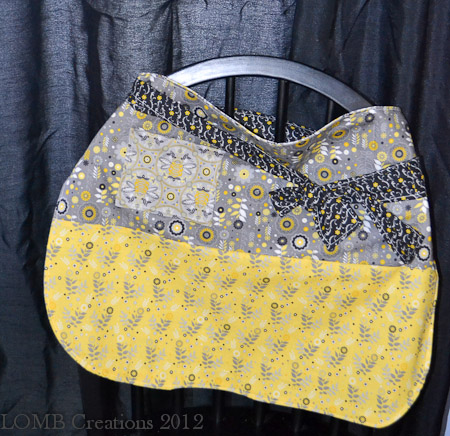
Than I got started planning out a purse. Yeah I know I need to make another one like I need a hole in my head. I spent about an hour getting it ready and sewing it together. I than stepped away when I had the outside all done. I did some other stuff and than started on the lining which took like 15 minutes to sew, stick in and finish it up. Overall it was a simple bag to make of my own design. I have some kinks to work out if I wanted to maybe sell a version of it. We will see.


Monday, February 27, 2012

Special Series- Cleaning the Linen Closet

6:24 AM 0 Comments
Yep I tackled that finally after years of dreading it. I sort of felt like Monica on "Friends" who had her secret closet filled to the prim with all sorts of things in there. I honestly had wedding presents in there that I had never used because I didn't have a good place for them ( yes I know married almost ten years). Now with the living room redone, I put some of the stuff out. 

I also got those space bags to put all
of the actually linens in that we don't use on a regular basis. Those are so smooth to work with were fun to suck all the air out of them. I used three extra large ones, two large ones and two medium ones. I also took a bunch to good will of things I no longer need like sheets for a full bed I no longer own. I think it looks so nice and I stuck all that extra stuff in my closet looking for a home in there as well (I tackled our closet to but didn't take pictures of it). 


I feel so much better now that these are done and am going to work hard at keeping them organized, especially my own closet. 


All of this was jammed in there plus I have a big pile that you couldn't see.


After with the space bags. 

Friday, February 24, 2012

Special Series- Top 6 Organizational Tips

12:00 AM 0 Comments
I talked on Tuesday about how I organized my pantry which gets so out of control so fast. It got me thinking about all those little tips that I use to organize our lives that I think work really for us. So I figured I would share them with you all.

1. Have separate laundry bins for all of your clothes. I bought three bins from Wally World that re nice a tall and fit a lot. They even come with their own labels of whites, darks, and lights. I have found since I got this, it has made laundry so much easier to get a handle on.

2. A basket on the stairs for all that stuff to go up. I have a decorative basket that I put at the bottom of the stairs to take up all those odds and ends like toys, and dirty kitchen towels (I have a second floor laundry room). The kids have actually learned to take it up and pull their stuff out of it. It is a easy way to put all that stuff in with out cluttering up the stairs.

3. Menu Board which I made here which helps me to plan out the weekly meals. I only do the weekdays because the weekend is fluid at our house. We may go get a big lunch on Saturday and just eat a light snack for dinner. I mark down everything I am going to make which helps me to plan what needs to be defrosted instead of standing at the fridge trying to figure it out at 4:30 each evening.

4. Kitchen chalkboard to mark down messages, and grocery lists. I got a decal one from one of the craft stores and put it on the front of my fridge. It is so nice to have because we will instantly write down anything we are out of and my husband has been so good at it to. It helps to make sure I don't miss anything when I go shopping. I just take a picture with my phone and I have an instant list with me.

5. My new favorite online tool in the Family Calender you can create at Cozi Central . I created our calendar and add all those important dates on there. I get a weekly email from them as to all of the goings ons and I can add to have email and text alerts to me when I really need to remember things. It also goes to my husband as well each week so he knows what is going on. When ever we need to go somewhere, I add it on to the calendar. There are also lots of other wonderful features on there as well that you can use. I have found it so nice to have plus there is a mobile version which I also have so I can instantly input data in.

6. Spend 15 minutes cleaning each day so that you don't have to do a marathon cleaning at the end of the week. I notice that when I do the big stuff like wiping up the floors, that goes really quick. I also pick an area to work on for the 15 minutes like one of the kid's rooms where I pick it up, dust, and do whatever needs to be done. At the end of week, I don't have all this stuff I need to do and the house is pretty neat and clean. Plus I get the kids involved in it as well and they now automatically do it without being asked very often.


Thursday, February 23, 2012

Salmon Burgers with Sauteed Veggie Pasta

12:00 AM 0 Comments
Okay I know this might be hard to believe but both my kids ate the Salmon Burgers and loved them. My husband told me this was a winner of a meal and honestly it was super easy. I went to the grocery store and bought premade salmon burgers with a mixture of jalapenos, tomatoes, corn, and onions. They took like 8 minutes to cook (4 on each side). Now when I can make something the kids like, it is easy, and it is healthy is a major plus.

The actual thing I made was the Sauteed Veggie pasta which Miss O asked for three servings of it. I took zucchini, mushrooms, and red bell peppers. I sauteed them with some olive oil until they were soft. I than took some butter and oregano and added into make a light sauce. I than tossed it with some cooked small style noodles. It was a warm dish that the kids loved. It both had a starch which I like to serve as well as our veggies . Plus it was a great way to make use of the veggies from the co-op that I am in.

Wednesday, February 22, 2012

Easy Peasy Kitchen Apron

12:00 AM 0 Comments
I got this fabric for Christmas from my mother in law and have been trying to figure out a good use for it. I thought that would be a really cute apron to make it. I loved all of the coordinating fabrics in the fat quarter pack she gave me. I went to work creating an apron I love and the little bee pocket is super cute on it.


This was a pattern I designed by myself and I thought that if you would like to get the pattern, I am selling it for $3.00 via paypal. I have had many people ask about my patterns in the past and I am going to start working on getting them written up and on the website for future purchase. You can go here to purchase the pattern. 


Tuesday, February 21, 2012

Special Series- Organize your Life!!!

12:00 AM 0 Comments
I am going to start a special series that is all about organizing your life. Spring is right around the corner, okay about here for Houston, and I thought it would be a great way to give some tricks as to organizing our lives. I try real hard to be organized and for the most part I am put yes I do have areas where I fail like the pantry which is the focus of this first post.

I try and try to keep it organized and have almost on a weekly basis pull things out and reorganize it to fit this week's groceries in. I about had it today when my husband open the door and asked me where the peanut butter was in the midst of all this chaos. I told him to look low like where the kids would put it. I decided that it needed to get done especially after i saw the amazing pantry on Pinterest the other day as well. Mine doesn't look as nice but it is organized and I hope it stays this way.

I started out with going to both the dollar store and Wally world to get containers to put like stuff in. I hate all the boxes of oatmeal floating around as well as the spices falling off the shelf all the time. So after the shopping spree and about 70 bucks later, I had all the stuff I needed.

I pulled it all out and as you can see from the picture, this was a lot of stuff. I have like ten boxes of instant potatoes in some form (Scallop, mashed, etc). I also had so many packs of oatmeal and a variety of pasta that needed to be put together in one home. So like two hours later and lots of figuring it all out, my pantry is cleaned out. I feel so good about it. The blue and green bins hold the kids snacks, pasta/rice sides, coffee and teas in them.

I have all the baking items like flour, sugar, etc in their own bins as well as the cereals and pasta in containers as well. I feel so much better that I can see it all so I won't be buying the same thing over and over again to add up to a ton of things.

Here is the finished pantry all organized and let's hope it stays that way!


Monday, February 20, 2012

Dollar Store Craft

6:46 AM 0 Comments
I have professed my love a few times for Pinterest on here and I see so many crafts I just love on there. This one today was inspired by one I saw on there and it cost about 5 bucks to make so if you made more than one it is still really cheap. Everything I got was from the dollar store which amazed me. Just walk down there craft aisle you will be surprised at all the things there.

I used the following items:
- a glass vase
- two bags of pebbles
- 2 sets of black bamboo (each pack is two five foot pieces).

I just filled the vase up with the rocks, and trimmed down the bamboo which was easy. I stuck them in and put some more rocks in for stability. I am going to decorate it for Easter but I haven't decided with what yet and will show picks when I finally do it.


Sunday, February 19, 2012

Saturday, February 18, 2012

Modified the Coffee Filter Wreath

12:51 PM 0 Comments
I was sad to see Valentine's come and go. I love the reds, pinks and whites in all the decorations. I figured it was time to move on to the next holiday in the Queen Mommie's house so slowly shamrock green is creeping in. I took my wreath  that I created back in January and pulled off all of the hearts. I let it dry out some from hanging on door for the past month in what seems like constant rain here in Houston. I than punched out some of the pennants using the petite pennant punch. I also punched out 8 hearts to form the shamrock as well as the little letters to spell out Happy St. Patty's Day. I think it turned out really cute and I was happy that I could the wreath again to create another holiday centerpiece for my door.


Thursday, February 16, 2012

My Art Project

2:38 PM 0 Comments
There has been so much canvas art that I have seen every where. People have been creating there own so I tried my hand at it.

I used some simple things:
- Black vinyl that is sticky
- Blue Vinyl that is sticky
- Canvas
- Tool to smooth vinyl down
- Lots of cutting and punching out!


It took about 30 minutes to do the whole thing. The biggest thing was punching out the leaves from my punch. It kept getting stuck so I had to pull the vinyl out of it. Once I figured out how to punch right, it went much smoother. 

This is the finished project!


Italian Meatloaf

12:00 AM 0 Comments
I have made many versions of this over the last year or so. Each time trying something new with it and I think this time was the best. The only thing I would add that I forgot was my green or red pepper. I always like to make a nice family dinner on Sunday nights where we all sit around to discuss the past and coming week. I know it sounds old fashion but these are the things my kids will remember not the new toy we buy them.

This has become a family favorite and this time I used something different which was fat free so it didn't add much in that area but lots of taste. My husband said it was the best one yet so that is a winner. The only thing is my meatloaves are never anything to look at even though I try and try to get something like my grandma use to make.

Ingredients
2lbs of ground beef
3 slices of whole wheat bread cubed
1 egg
1/2 stick of cream cheese soften to room temp
1 can of tomato sauce (the smaller ones)
Diced mushrooms
Diced Red or Green Pepper
1 cup Shredded Mozzarella Cheese (Optional)


I mixed everything but the tomato sauce and mozzarella  together in a big bowl. You know got your hands dirty and than formed the meatloaf on a baking sheet. I than added the tomato sauce on top coating it. I than baked it in a preheated 350 degree oven for about 75 minutes. For the last 15 minutes I sprinkled on the mozzarella cheese and let that melt over the top of the meatloaf.

As an added bonus you could use 1 lb of ground beef and 1lb of ground Italian sausage to make the meatloaf. I have made this version as well and it is equally as good.  Though I know sometimes you can or can't find ground Italian sausage (when I don't and need it I just buy links and slice them open).

I also made a side of green bean casserole with it. Green beans are not a favorite vegetable but for some reason in a mixture of cream of mushroom, cream of celery, and cream cheese makes it edible to me.

Ingredients
1 bag of frozen green beans (thicker cut ones)
1 can of cream of mushroom
1 can of cream of celery
1/2 stick of cream cheese soften to room temp.
French Fried Onions

I just mix it all together and  stick it a Pyrex dish. Top with the onions and also bake for 90 minutes at 30 degrees. This is a very saucy version of it and the casserole gets better as it sits so left overs are a plus.

I topped dinner off with our new favorite dessert by Ree Drummond. I made it slightly different this time and cut the sugar by a 1/3 using 2/3 cups instead and not topping it off with a sugar dusting.

We were all stuffed and enjoyed the time together. We try and eat most nights together but Sunday is the vital one that we maintain each week. It is a good way to be a family especially with all the hectic lies we live.


Wednesday, February 15, 2012

Sew Wednesday Purse

3:42 PM 0 Comments
Yes I tackled another sewing project which took up most of my afternoon while the little one napped. I have had this charm square pack for awhile and wanted to make a bag out of it. The line of fabric is called Central Park from Moda- yeah my favorite fabric company.

I think the bag turned out really nice. I used every single charm in the pack and needed some extra fabric which I had in my stash to make the yellow handle. I used like 16 charms for the outside and 16 for the inside. I guess if I wanted to I could turn it inside out but the outside is quilted where the inside isn't. I than just took the inside layer to create the binding around the top. I finished it off by making handles and attaching using some key rings. The metal works well with this fabric and I can attach stuff to them like my phone case. t is the perfect size for me and not heavy because i used lighter batting for the inside.


Rainy Day Sewing

3:33 PM 0 Comments
It was so dreary today and it rained on and off, so with it being Sew Wednesday I went to work on some sewing projects.

My first one which is showcases in this post is something I have been wanting to make. I had a ton of scraps in my stash to make this and it took 2 12x12 pieces of red fabric, and some charms from a solid color charm pack I have had for ages (I think I won it at the quilt store).

So I went to work on cutting, and adhering it onto the fabric to create my very own TARDIS pillow as my homage to Doctor Who. I know this is so geeky and my husband laughed when I showed him. I think it turned out really cute and who doesn't want a blue police box in their house!!


Monday, February 13, 2012

My hubby is crafty too!

12:09 PM 0 Comments
I think after a dozen years it is finally rubbing off on my husband to be crafty. He has over the years built me an awesome shelf and quilt rack. He also just over the holidays built an incredible table for his bar. I keep forgetting to get pics of it. The other thing he has started doing is decorating his VW bug for the seasons. Of course for Halloween the orange bug was a jack o'lantern and over Xmas was a giant ornament.

Though he might have out did himself this time. He has wanted and talked about making a car into the General Lee. I had to talk him out of it with out old Kia prior to selling it. So when he got the bug in October, I knew it was only a matter of time. I actually kept my mouth shut and than he started on it again. I actually totally came up with the idea that it be the Lt. Lee because well it is smaller and Lt. could also stand for little. 

So this weekend he went to work cutting out his vinyl clings and attaching them to the car. He than traced out the letters in white vinyl electrical tape. The car looks sweet and is so funny. So now we have all been assigned names from the Dukes. I am for some reason Uncle Jesse because the 5 year old scooped up Daisy instantly.

So here is the car all done and I think it is so cute and well a little tongue and cheek in the humor!


Menu Board- My Version

11:37 AM 2 Comments
So I totally admit I love Pinterst and have found so many awesome ideas on there for the home, crafts, kids, and lots of recipes I want to try. I saw this Menu Board on  there the other day. I had repinned it from someone else and once I saw it, so wanted to make it as soon as I could, so today as it rains, I set to work on it and of course made my own version. I actually saw this Weekly Schedule and used that as well for inspiration.

So I started out with an 11x17 frame I picked up from the craft store and with my 50 percent off coupon it cost 3 bucks but beware that it isn't as sturdy and could break.


I cut seven 2.5 inch stripes of coordinating paper and than adhered it onto the insert that comes with the frame. I did have to trim off excess because my paper was 12 inches long. 


I inserted the covered insert back into the frame and than pulled out my trusty Cricut. Be warned this can do a number on the pads for cutting. I used a new one which was super sticky and well  the vinyl really stuck and had to be tossed out. So if you use a Cricut, use a pad that has already been used. 

I used Black vinyl 

The cricut


Peeling off the letters

Attaching to the top of the glass.

I cut out the words Menu, and than abbreviation for the week. I only used Monday thru Friday because honestly those are really the only days I cook. Saturday and Sunday, it really depends. The Menu letters were 1.5 inches while the days of the week were 1inch. Because I don't like things so even, I alternated the days on each side of the board. 


When I was done with the letters, I also added on some stickers of desserts. The paper and stickers are part of the new SU mini catalog called  Sweet Shop. I really thought it looked cute for a menu board with all the little sweets on it. 


I than took a dry erase marker and wrote down what we will be having for the week. The dry erase marker wipes right off and I also attached heavy duty Velcro to the back and hung it up on my cabinet. I used one that I don't go in all that often because I figured if it keeps getting closed, no Velcro in the world will hold it up there. I can just take it down to wipe off and add the new menu for next week. 


Friday, February 10, 2012

Projects this week

12:46 PM 0 Comments
I actually did get some great projects done this week. When my hubby is out of town, I have more me time, so I craft, and card make. I had some fun with it.

A card I created

New stamps for new projects!

Sweet Cupcake


Sweet Ribbon Jar

Card that was inspired by a Lisa Young card. 


Chaos in the Mommiedom

12:34 PM 0 Comments
There has been quite a bit of unrest this week in the Mommiedom. The Queen has been a travel widow while the Daddy is away on business. Usually it isn't that bad but the two year well has been difficult. I am glad Daddy returns tomorrow from the trip and well I am likely going to run away (okay maybe I will just get out sans the kids at some point).

This was the first time my husband has traveled in about 6 months. Last time, I didn't have a kindergartner so having to get us all ready and out the door instead of the kid and husband was a new experience. The hardest part of it all was that the two year old decided this was the week to go into full fledged terrible twos. He tested every boundary possible and than some I didn't even realized existed. Monday he saw more of the timeout area than I think any where else.

Tuesday he seemed to even out some and well was good most of the day though he is hitting a lot which I need to nip. He seems to do it mostly out of frustration and anger when it isn't going his way.  He is about 180 degrees different from Miss O the oldest. She tested but not to this degree. I have been told it is a boy thing and that this is just how they are and will outgrow it. The problem is I am not sure I am going to last it till than.

Just kidding, I will. I actually started doing some new things with him. He really likes stories, so I amped it up in reading more books to him.  We went from like one or two a day to tops of half a dozen and sometimes the same one over and over again. I have learned a lot about Chuggington now.

I did some reading up on how to deal with that difficult child- you know that child who is exactly like you! Yeah I know he is a version of me. I see way more of that stubborn streak like me than I ever did in Miss O. I think because he is so much like me that we butt heads so much. I am a lot like my mom and well that is why we had permanent bruise on our foreheads as I was growing up!

Mr. L is what you would call a spirited child- you know the one who says "no" louder than the rest and screams more often. That kid whose personality is the one that you get those looks at. You know the ones, it is both the handle your child but I sort of feel bad for you looks. That one we all give other mothers at times. I know I have given it and yes with Mr. L I have received it. Oh I remember the first time it happened to me- I was shell-shocked by it.

My son is who he is- incredibly smart, adorable, and currently wearing a shirt that states he drives me crazy. He is also stubborn, strong-willed and seemingly getting sneakier about his actions. He spilled milk on the floor the other day and I asked him what happen. He pointed to the dog and blamed her. It made me laugh.

Mr. L and I have to come to an understanding one where I understand him and he chooses to not! All kidding aside, it is important to me that we get to a point where he understands that he can't act this way and I just need to keep consistent on it. As hard as it is to keep doing the same thing, it will pay off one of these days , weeks, months, okay who I am I kidding- likely years!!

I am so happy that this week is about over. Friday so far has been good and tomorrow, the hubby is picked up and I have some relief in this thing we call parenting.


Friday, February 3, 2012

Coffee Filter Wreath 2

8:46 AM 0 Comments
Okay I really like my coffee filter wreath I created and have hanging on the front door. Everyone gets a kick out of touching it and trying to figure out what it is made out of. It is pretty easy to figure that one out but I did some goggling to see what others are doing with the filters and I found so many awesome ideas. I was inspired by so many of them and took to working on another one but this time is was way different and far more complicated to do. I think it took a total of about 4 hours to create over two days.

I first started off with my supplies which were about 100 coffee filters, paint, paper dishes, newspaper, masking tape, and a floral ring.

 I than took paint and diluted with water. I just added the paint to the water and mixed it up to make it cloudy looking.
 I than dunked the separated coffee filters into the dishes. I colored about 40 though the green and light blue-were very light- just kissed with color. I let the filters dry overnight.

I than took a white coffee filter and cut the center out and rolled a rosette. 

 I added a ring of the dyed filters around that creating a larger flower.
 This is how I cut out the centers. The different ways I cut would create either wider fuller flowers or more closed up ones.
 I used lots and lots of masking tape to tape the pinched bottom of each section of the rosette.

I just than started building the wreath as I went along. I am sure if you made all of them first but I was on unsure how many I would need. I lost count after awhile but I think I am close to 40 handmade flowers. 


Using the centers of the cut out filters, I created little rosettes to fill in areas where you could see the floral ring. 


Closeup of some of the flowers.


 Building the wreath up!

The completed wreath after about a total 4 hours (about 30 minutes to dye and 3.5 hours to create and build).


The completed wreath hanging over my piano. I really like it but would have liked darker colors. I think if I make another one I am using the natural filters and darker colors. 


I found the filters nice and sturdy in creating the roses. I think tissue paper would work but it would be thinner and in my opinion way more cutting.